Welcome to the Webex Help pages
Webex is the university's official virtual classroom tool which is fully integrated into Brightspace. Your instructor might use it to set up real-time class meetings or office hours.
In this resource, you will find information on ...
- how to locate Webex in Brightspace,
- how to join a Webex virtual classroom session from Brightspace,
- how to navigate the Webex interface.
At the end of the resource, you will also find an FAQ section with answers to additional questions you might have.
.png?1597152132362)
Throughout the resource, we will be providing some links to the official Webex Help pages.
We have found that images on Webex pages display best when you are using Google Chrome. So if you find that you cannot see the guidance properly, try switching your browser to Chrome.
About using this resource
How to navigate the resource:
- Use the menu on the left-hand side to jump to a particular page (1), or
- Use the arrows in the top right-hand side corner of the resource to navigate to the next page within the resource (2).
How to print the resource:
- Use the print button in the top right-hand side corner of the resource to print the resource as a PDF (3).
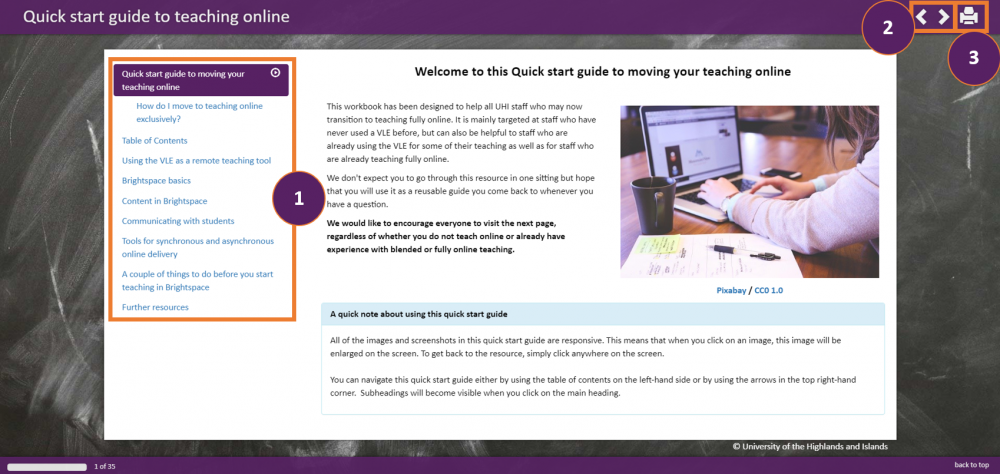 Screenshot of navigation options and print option
Using Webex on your computer
In this section, you will find information on:
- How to locate Webex when you are accessing Brightspace on your computer, and
- How to join and navigate a virtual classroom session run through Webex.
.png?1597152132362)
Please note that we would recommend using Google Chrome as your browser for any Webex virtual classroom sessions when you are using a Windows PC.
Webex system requirements
Most computers should be able to run Webex without any issues, but you can use the Webex System Requirements website to check minimum browser and OS requirements.
In addition, you can download the Webex extension for Google Chrome or the Webex extension for Mozilla Firefox to help you run any Webex virtual classroom sessions via a desktop app.
On the following pages, you will also find information about how to join a Webex session via your browser, though.
Downloading an extension and running Webex virtual classroom sessions via a desktop app, will give you access to a couple more features, such as virtual backgrounds but is not a mandatory requirement. You can run any Webex virtual classroom session just as comfortably via the browser you are using and will still have access to the most important Webex features.
More information can be found on the page How to navigate Webex below.
How to locate and access Webex
There are 3 different options for accessing Webex.
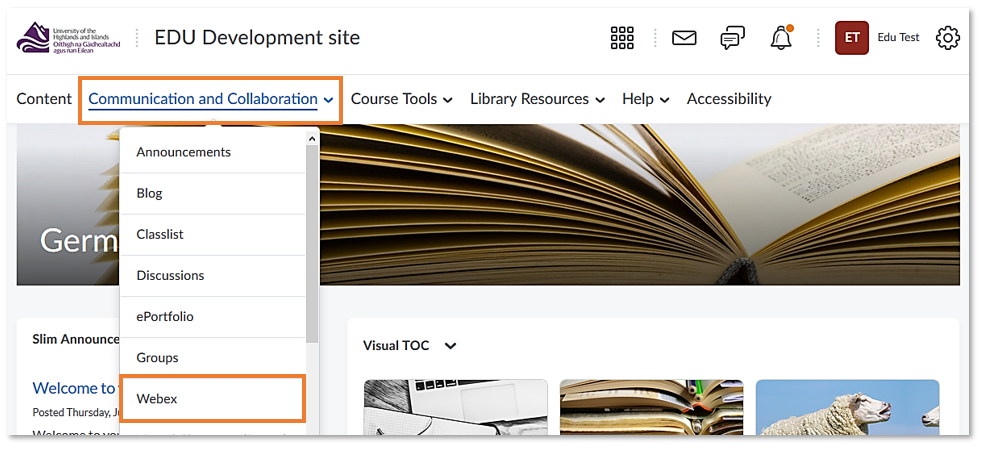
The easiest way to access Webex in Brightspace is via the Communication and Collaboration drop-down menu in the module / unit / course navbar (Figure 1).
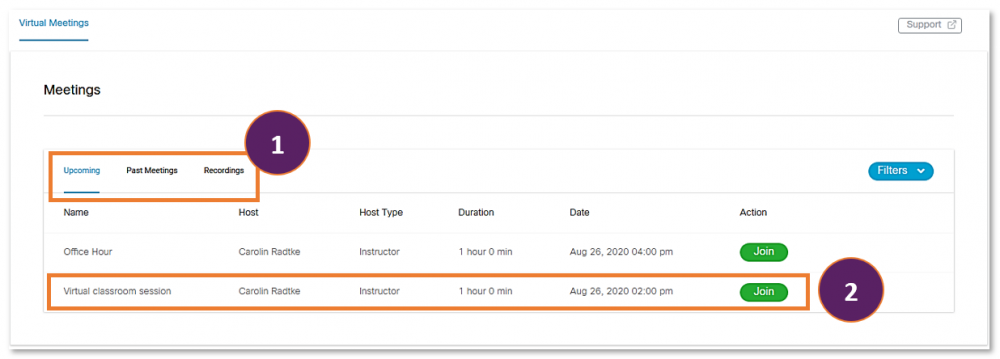
You will now see the Webex interface.
There will be three tabs - one for Upcoming meetings, one for Past meetings and one for Recordings (1).
In the Upcoming meetings tab, you will see all the upcoming sessions scheduled by your instructor (2). Information about the sessions include:
- name of the instructor who scheduled the session,
- date and time,
- and a green Join button.
(Figure 2)
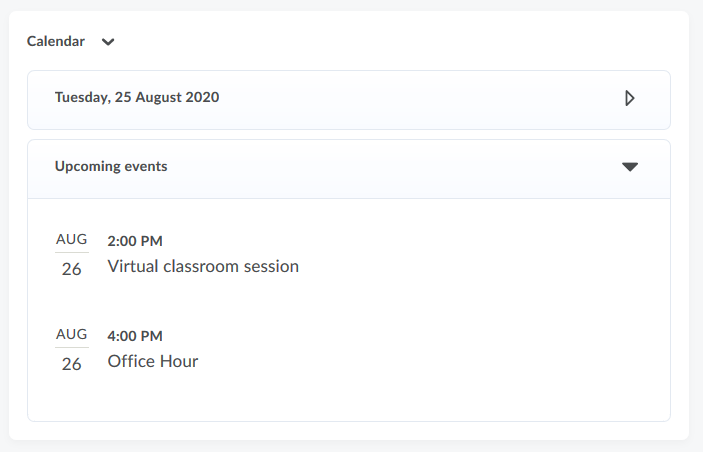
Every time your instructor schedules a virtual classroom session in Webex, an event will be created in the Brightspace Calendar tool at the bottom of the module / unit / course homepage (Figure 3 opposite).
You can click on any of the Upcoming events in the Calendar tool find out more about it.
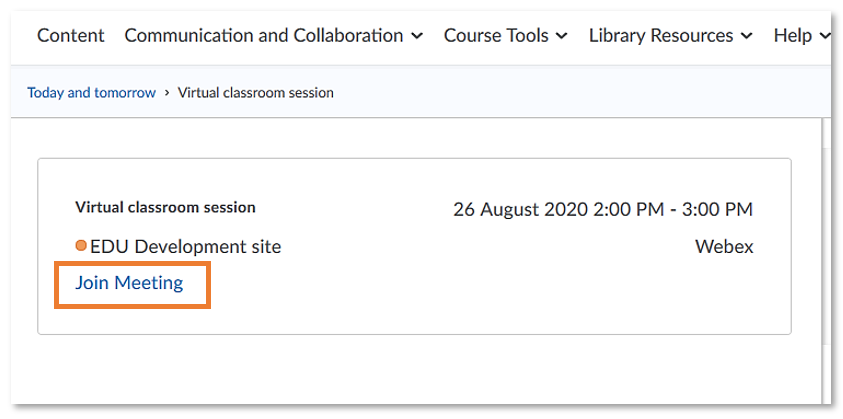
Once you have clicked on a virtual classroom event in the Calendar tool, the event will open.
You can now see information about the date and time of the virtual classroom session as well as a blue Join Meeting link at the bottom which you can use to join the session (Figure 4 opposite).
Your instructor might have sign-posted Webex in the content area for you, i.e. in a folder called Virtual classroom sessions (Figure 5 opposite).
Please note that this folder might be labeled differently in your module / unit / course.
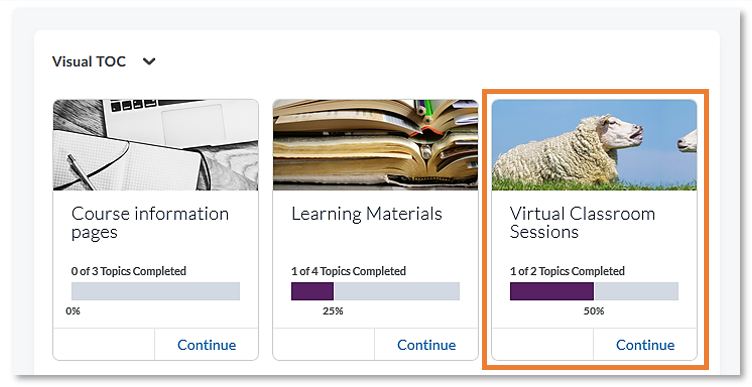
Open the folder to access the link to the Webex virtual classroom interface and click on it (Figure 6 opposite).
Please note that the link to the Webex virtual classroom interface might be labeled differently in your module / unit / course.
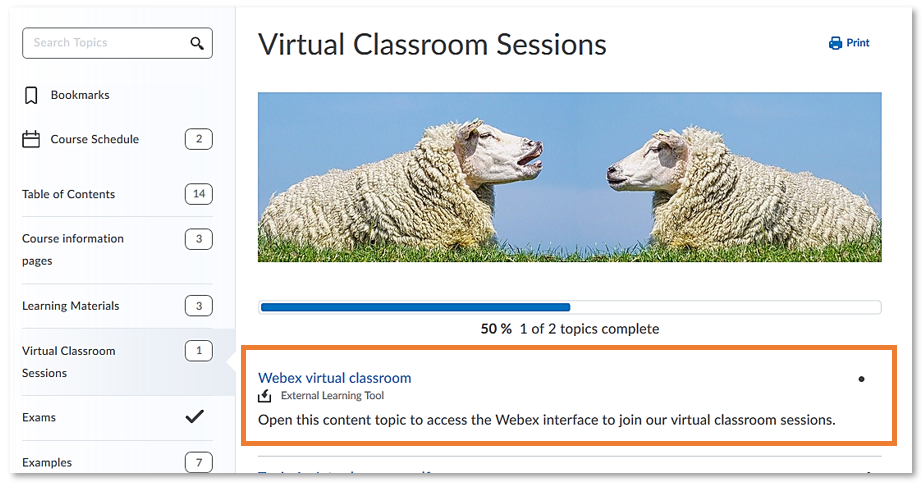
You will now be able to see the same interface pictured under Option 1 (Figure 7 opposite).
There will be three tabs - one for Upcoming meetings, one for Past meetings and one for Recordings (1).
In the Upcoming meetings tab, you will see all the upcoming sessions scheduled by your instructor (2). Information about the sessions include:
- name of the instructor who scheduled the session,
- date and time,
- and a green Join button.
(Figure 7 opposite)
How to join a Webex session
Based on the different ways of locating Webex, there are also different ways for joining a Webex virtual classroom session.
If you are in the Webex virtual classroom interface, you can join any virtual classroom session by clicking on the green Join button (Figure 1 opposite).
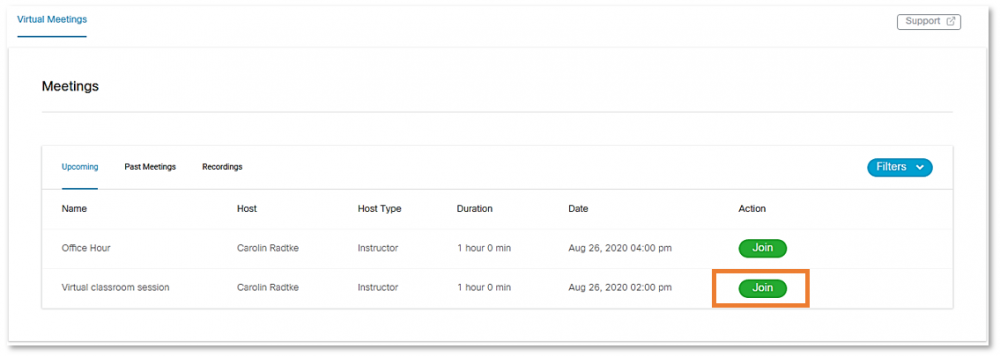
If you are accessing the appointment for a Webex session via the Brightspace Calendar tool, open the event and click on the blue Join Meeting button (Figure 2 below).
Once you have joined a Webex session this way once, you will also be able to join any future sessions via the Join Meeting link in the Calendar appointment.
To join the Webex virtual classroom session via a link, simply click on the link your instructor sent you or copy-paste it into a browser.
Once you have clicked on Join, Join Meeting or a link your instructor sent you ...
Google Chrome
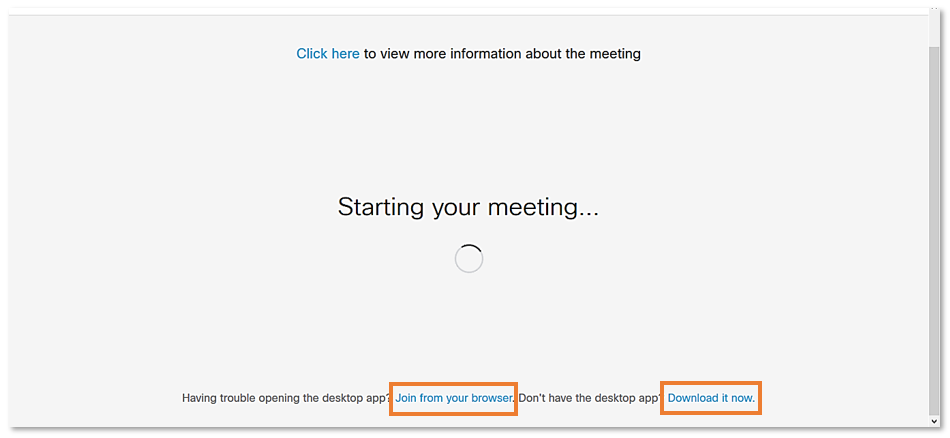
If you have not downloaded and installed the Google Chrome extension yet, you will be able to click on a Join from your browser link. You will now be able to join the Webex virtual classroom session in Google Chrome.
At the bottom of the screen, you also have the option to Download the extension now. More information on the Google Chrome extension can be found on this page.
(Figure 4 opposite)
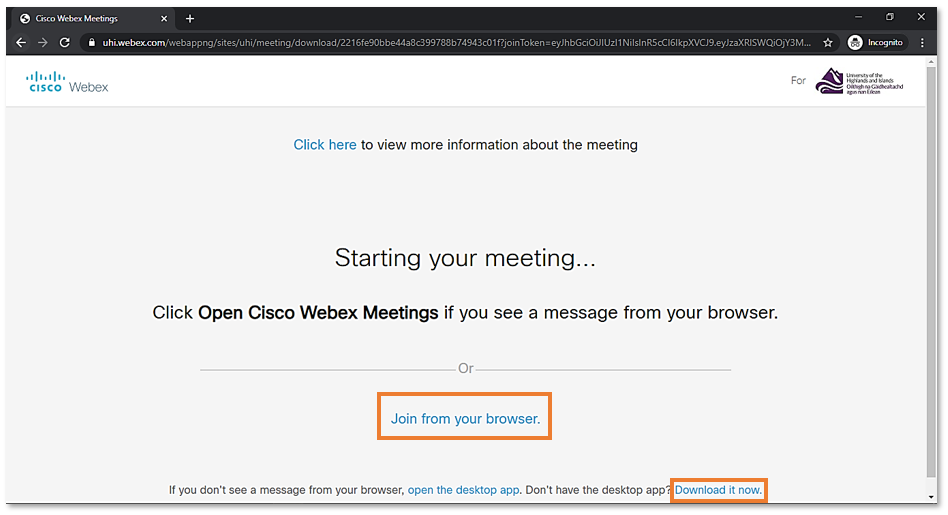
If you have downloaded and installed the Google Chrome extension prior to clicking on the Join button, the Webex desktop app will either open the Webex session automatically, or a pop-up window might appear and you will be able to open the Webex session in Cisco Webex Meetings (Figure 5 opposite).
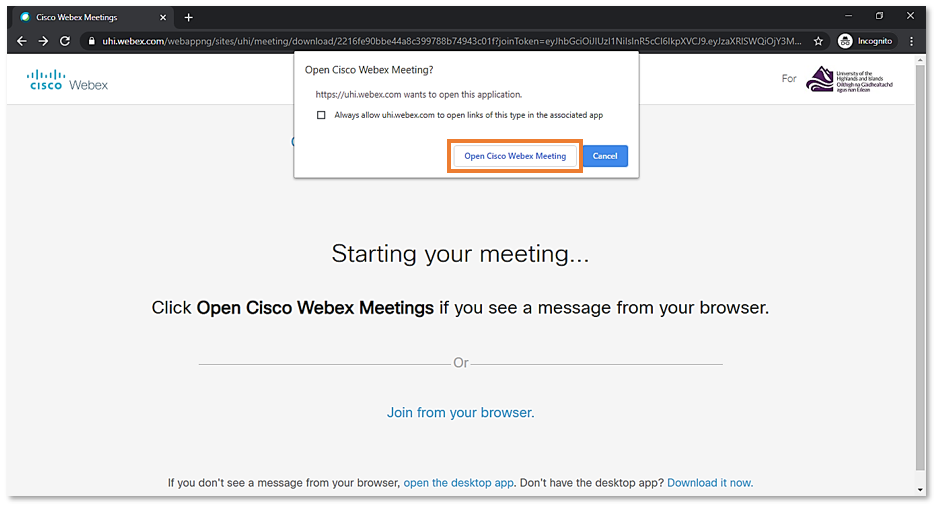
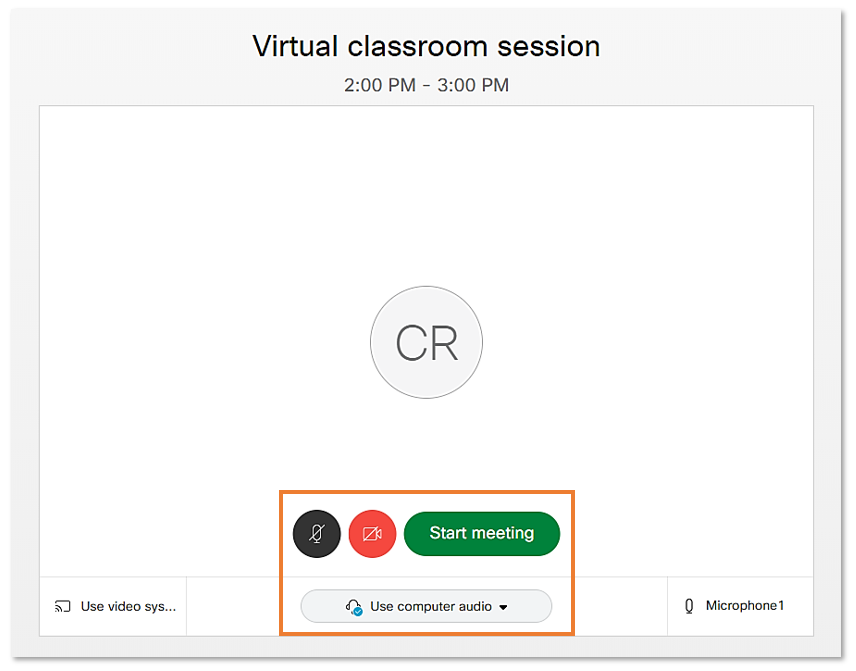
No matter which way you join, via the browser or the desktop app, you will now see a screen where you can choose whether you want your microphone and / or video on or off when you first enter the Webex session.
If the microphone and / or video button are dark grey, it means that when you enter the Webex session, other participants will be able to see your video and hear you.

If the microphone and / or video button are red, it means that your webcam and / or microphone are off. Other participants will not be able to see or hear you when you first enter the Webex session.

Note:
Even if you enter the session with your microphone muted and / or your camera off, your instructor will know that you are there as you will appear in the Participants list.
When you are ready, click on the Start meeting button to enter the Webex session.
(Figure 6 opposite)
If you have not downloaded and installed the Mozilla Firefox extension yet, you will be able to click on a Join from your browser link at the bottom of the screen. You will now be able to join the Webex virtual classroom session in Firefox.
At the bottom of the screen, you also have the option to Download the extension now. More information on the Firefox extension can be found on this page.
(Figure 7 opposite)
If you have downloaded and installed the Mozilla Firefox extension prior to clicking on the Join button, you will have a similar experience described above for Google Chrome. The Webex desktop app will either open the Webex session automatically, or a pop-up window might appear and you will be able to open the Webex session in Cisco Webex Meeting.
No matter which way you join, via the browser or the desktop app, you will now see a screen where you can choose whether you want your microphone and / or video on or off when you first enter the Webex session.
If the microphone and / or video button are dark grey, it means that when you enter the Webex session, other participants will be able to see your video and hear you.

If the microphone and / or video button are red, it means that your webcam and / or microphone are off. Other participants will not be able to see or hear you when you first enter the Webex session.

Note:
Even if you enter the session with your microphone muted and / or your camera off, your instructor will know that you are there as you will appear in the Participants list.
When you are ready, click on the Start meeting button to enter the Webex session.
(Figure 8 opposite)

How to navigate Webex
Depending on how you joined a Webex session, you will have a slightly different experience.
If you have joined via a browser, you will see all your fellow participants on the screen as well as any content your instructor might share.
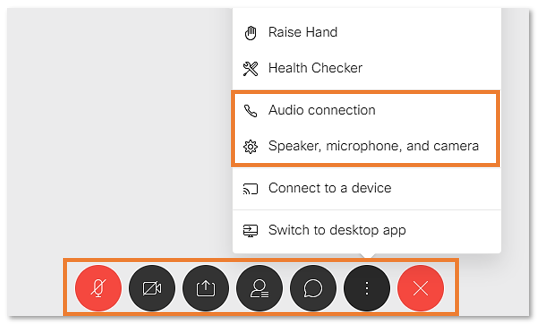
In addition, you will have access to the most necessary Webex features in a menu bar at the bottom of the screen (Figure 1 opposite).
From left to right, you have access to...

Microphone button: Mute yourself when you are not speaking (button turns red); unmute yourself when you are speaking (button turns dark grey).

Video button: Switch your webcam on or off. Webcam is off when the button is red and on when the button is dark grey.

Participant button: See the other participants in the Webex session.

Chat button: Chat with the other participants in the Webex session or send a chat question to your instructor.

More options button: Check and customise your speaker, microphone and camera settings as well as other features.

Leave meeting button: Leave the Webex session.
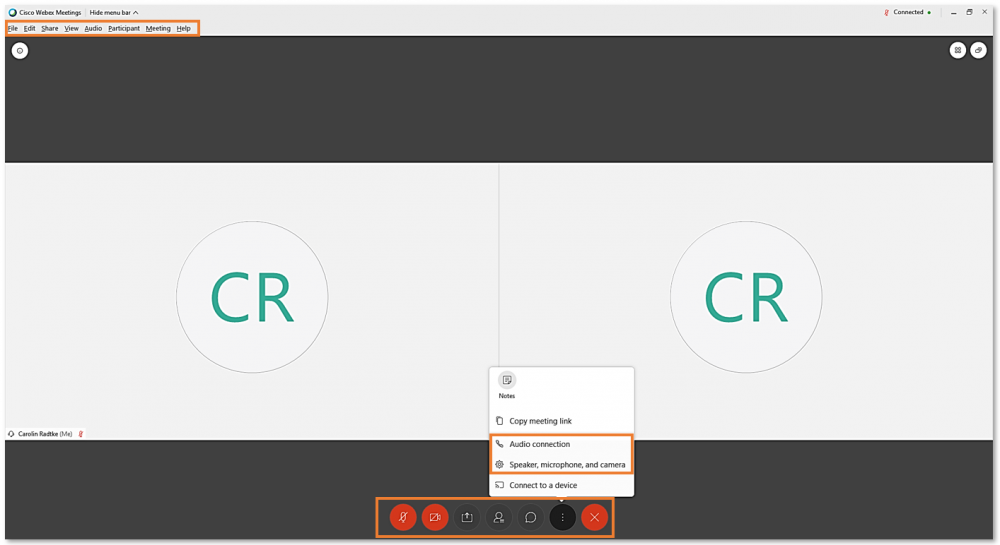
If you have joined via the Webex desktop app, you will see all your fellow participants on the screen as well as any content your instructor might share.
In addition, you will have a menu bar at the top of the screen.
The most notable feature you will have access to here (as opposed to when you join via your browser) is the Change Virtual Background feature which can be accesses via the Audio drop-down menu.
More information about this can be found on the Use a Virtual Background in the Cisco Webex Meetings Suite page.

At the bottom of the screen, you will also have access to some other features (Figure 2 opposite).
From left to right, these features are ...

Microphone button: Mute yourself when you are not speaking (button turns red); unmute yourself when you are speaking (button turns dark grey).

Video button: Switch your webcam on or off. Webcam is off when the button is red and on when the button is dark grey.

Participant button: See the other participants in the Webex session.

Chat button: Chat with the other participants in the Webex session or send a chat question to your instructor.

More options button: Check and customise your speaker, microphone and camera settings as well as other features.

Leave meeting button: Leave the Webex session.
Webex mobile app resources
You can join Webex virtual classroom sessions from your mobile iOS or Android device.
More information on downloading and running Webex from your mobile device can be found on the Webex Mobile Apps resources page.
Troubleshooting
If you have any issues or questions which are not answered below, please visit the Get Started - Webex pages to see if you can find an answer there.
If you cannot resolve your issue this way, please raise a Unidesk ticket.
.png?1597152132362)
Just as a reminder:
We have found that images on Webex pages display best when you are using Google Chrome. So if you find that you cannot see the guidance properly, try switching your browser to Chrome.
If you try to join a Webex virtual classroom session before your instructor has started the session, you might see the following error message (Figure 1 opposite):
Virtual classroom session either hasn't started or has ended. Please try joining during the session's scheduled start and end times.
Simply close the tab and try to join the session again closer to the start time.

If your issue continues to persist, please raise a Unidesk ticket.


